Bunny Approved Carrot Cake*
") | |||||||||
| From veganbaking.net |
 |
| From veganbaking.net |
2 medium sized carrots (about 5 to 7 ounces)
¼ cup + 2 Tablespoons sugar
½ cup pineapple pieces
¼ Tablespoons non-dairy milk
2 Tablespoons unrefined coconut oil
1 Tablespoon + 1 teaspoon mild molasses
1 teaspoon vanilla extract
1 teaspoon cinnamon
1 teaspoon nutmeg
¼ teaspoon cardamom
½ cup whole wheat flour
½ cup all purpose flour
1 teaspoon non-aluminum baking powder
½ teaspoon baking soda
3 Tablespoons raisins
3 Tablespoons chopped walnuts
1)
Preheat your oven to 350F (177C). Lightly coat a 8 inch round cake pan with canola oil and dust it with flour, making sure to shake off any excess. Cut the carrots into 1 inch pieces. Process or blend the carrots, sugar, pineapple, non-dairy milk, coconut oil, molasses, vanilla extract, cinnamon, nutmeg and cardamom until coarse.
2)
In a large mixing bowl whisk together the whole wheat flour, all purpose flour, baking powder and baking soda.
3)
Add wet mixture to the mixing bowl containing the dry ingredients and mix until just combined. Mix in the raisins and walnuts with a spoon.
4)
Pour the mixture into an 8 inch round cake pan and bake for about 30 minutes or until an inserted toothpick comes out clean.
5)
When the cakes have cooled don't forget to cut their tops off to make them flat if necessary.
6)
To make frosting easier I recommend applying a crumb coat. This is a thin initial coat of frosting that absorbs the crumbs so the second coat goes on effortlessly and crumbless. After applying a thin, even coat of frosting to the cake place it in the freezer for about 30 minutes. After you remove the cake from the freezer apply the frosting as you normally would.
Bunny Approve carrot cake will keep for about 2 days at room temperature if it's frosted. If you plan to frost it later, wrap it in plastic wrap and store it in the freezer for up to 1 month.
*from veganbaking.net
Peanut Butter Chocolate Chip Cookies*
2 Tablespoons golden flax meal
½ cup + 2 Tablespoons non-dairy milk
½ teaspoon apple cider vinegar
1 ½ cups + 2 Tablespoons all-purpose flour
¾ teaspoon baking soda
½ teaspoon cinnamon
1 teaspoon salt
1 ¾ cups sugar
1 ¼ cups unsalted, natural style peanut butter
¼ cup unrefined coconut oil, melted
1 teaspoon vanilla extract
1 teaspoon molasses
 | ||||
| Veganbaking.net |
1)
Preheat your oven to 350F (177C). In a small bowl
whisk together the flax meal, non-dairy milk and apple cider vinegar.
Allow it to sit for 10 minutes so the mixture thickens and curdles. Line
two cookie sheets with parchment paper.
2)
In a medium mixing bowl whisk together the all-purpose flour, baking soda, cinnamon and salt until well incorporated. Set aside.
3)
In
another medium mixing bowl whisk together the sugar, peanut butter and
coconut oil until well mixed. Mix in the flax meal mixture from step 1
followed by the molasses and vanilla extract.
4)
Add
the flour mixture from Step 2 and mix until just incorporated. You may
have to use your hands at this point because the dough will be pretty
thick. Use your hands to fold in the chocolate chips.
5)
Form
the dough into 1 ½ inch balls and place them on the cookie sheet so
they're spaced about 2 to 3 inches apart. Use a fork to flatten them to ¾
inch and bake for 15 to 17 minutes, rotating the baking sheets halfway
through the baking duration. These cookies will not turn golden as they
bake so it's important to pay attention to the baking time.
Store
the cookies in an air tight container at room temperature for about one
week or in the freezer for up to two months. Makes about 22 to 24 Vegan
Peanut Butter Chocolate Chip Cookies.
*Veganbaking.net
 |
| bittersweetblog.com |
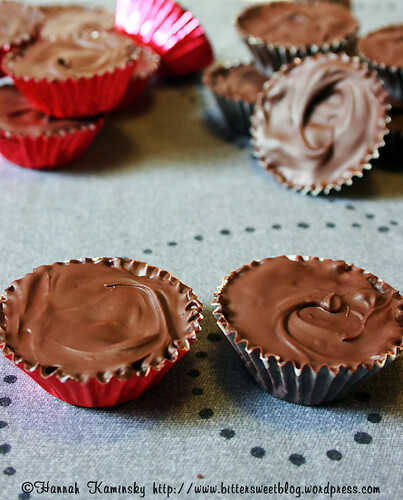
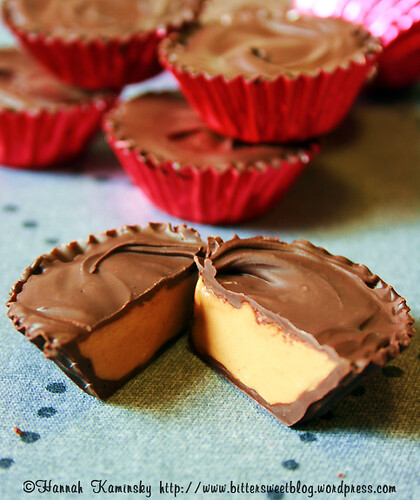
Chocolate Candy Cups*
1 Cup Chocolate Chips
Peanut Butter:
1/2 Cup Creamy Peanut Butter
1/4 Cup Confectioner’s Sugar
Splash Vanilla Extract
1/2 Cup Creamy Peanut Butter
1/4 Cup Confectioner’s Sugar
Splash Vanilla Extract
Peppermint:
1/3 Cup Vegetable Shortening
2/3 Cup Confectioner’s Sugar
1/2 – 3/4 Teaspoon Peppermint Extract (depending on desired intensity)
Splash Vanilla Extract
For both treats, begin by melting you chocolate in the microwave 30 –
60 seconds at a time, and stir thoroughly until completely smooth. Use
a spoon, thin spatula, or paint brush to brush the melted chocolate
over the insides of paper mini muffin cups, making sure to leave no
holes and spread it as evenly as possible. No need to go crazy though,
because even if the walls are too thin and break when removed from the
wrapper, I doubt anyone will mind after they take a bite! You will only
use about 1/2 – 3/4 of the chocolate, so set the rest aside for later.
Place the chocolate-covered papers into mini muffin tins so that they
retain their shape, and let them cool and set completely. You can speed
up this process by placing the tins in your refrigerator (or on the
windowsill like I did- It suddenly got cold out!)1/3 Cup Vegetable Shortening
2/3 Cup Confectioner’s Sugar
1/2 – 3/4 Teaspoon Peppermint Extract (depending on desired intensity)
Splash Vanilla Extract
To make the peanut butter filling, just stir together the peanut butter, sugar, and vanilla until completely homogeneous and toss the mixture into the microwave for 30 – 45, just to warm it through and liquefy slightly. Give it another good stir to combine everything again, and drop dollops of the filling into your prepared chocolate cups. Be careful not to rub the sides too much so as not to melt the chocolate, and fill each up to about 2 – 3 mm from the top. Let the filling cool completely.
To make the peppermint filling, place the shortening into a bowl and microwave it briefly until just melted. Add in the sugar and both extracts and stir everything together until smooth. Drop the mixture into the cups as described above for the peanut butter cups, and let cool.
Finally, take out the remaining chocolate and melt it back down into a liquid state. Spoon the chocolate onto each of the filled cups and spread it out to the edges to fill in any gaps. Let it cool once again until set, and enjoy your ghoulish goodies with friends!
 |
| bittersweetblog.com |
*these goul-ishly good treats are from bittersweetblog.com
Pecan Carmel Chews*
 |
| from veganbaking.net |
1 ½ cups + 2 Tablespoons sugar
1 ¾ cups Condensed Non-Dairy Milk
¾ cup coconut oil
½ cup agave or corn syrup
¼ water
½ teaspoon salt
1 ½ teaspoon vanilla extract
1 cup pecans, chopped
½ cup semi-sweet chocolate chips
1)
Line an 8 x 8 inch square baking pan with parchment paper and set aside. In a medium saucepan add the sugar, sweetened condensed non-dairy milk, coconut oil, agave syrup or corn syrup, water and salt. Mix with your fingers being careful not to spash sugar on the sides of the saucepan. Turn heat to high, cover the mixture and bring it to a boil. Uncover and reduce heat to medium.
2)
Prepare an ice water bath by placing ice water in a large mixing bowl. Keep this pot of ice water close by. This will serve two purposes: It will give you somewhere to dunk your hand if it gets splashed with scalding hot caramel. The pot of caramel will also get dunked into it when the proper temperature is reached in order to stop the caramelization process.
3)
Initially, the mixture may want to boil over and the heat will have to be adjusted as the mixture reduces. Resist the temptation to crank the heat up unless the temperature stops rising. If you see smoke puffs then you're probably burning the bottom and the heat should be reduced. If you get lots of smoke, remove the pot from heat, turn on your kitchen fan and wait until the smoke stops before turning the heat back on low and slowly bringing it back up as necessary. It should take around 20 minutes to get the mixture to 275F (135C).
4)
Remove from the heat and carefully dip the pot into the large mixing bowl for about 10 seconds in order to stop the caramelization process. Place the pot on an unheated stove top and stir in the vanilla followed by the pecans. When stirring be extra careful to not scrape the bottom. Doing so will scrape bitter burned sugar pieces into your precious caramel.
5)
Pour the caramel into the pan and allow it to cool completely at room temperature for at least 5 hours. When pouring the mixture remember to avoid scraping the bottom of the saucepan with a spoon or spatula. When it's cooled, remove it by lifting it out of the baking dish by the parchment paper. Slice it into 1 inch squares.
6)
Melt the chocolate chips in a double boiler. Dip the bottom halves of the caramel into the chocolate and place them on a piece of parchment paper for them to cool.
*this recipe is from veganbaking.net
Pumpkin Pie*
Makes 6 to 8 servings
 |
| cok.net |
- 1 1/4 pounds soft tofu (try “silken” tofu for a creamier texture)
- 1 16-ounce can pumpkin purée
- 3/4 cup maple syrup
- 3/4 cup sugar
- 1/3 cup unbleached all-purpose flour
- 1 tablespoon ground cinnamon
- 1 teaspoon ground ginger
- 1 teaspoon ground nutmeg
- 1 9-inch unbaked pie shell
Blend all of the ingredients (except for the pie shell) in a blender or a food processor until smooth. Pour the mixture into the unbaked pie shell and bake for 30 minutes. Then turn down the oven temperature to 350°F and bake for another 30 to 45 minutes, or until the filling is set.
*this decadent recipe is from cok.net
Peanut Butter Caramel Apples!*
 |
| theppk.com |
6 Granny Smith or Macintosh apples
1/2 cup well-stirred smooth natural peanut butter, at room temperature (I recommend Arrowhead Mills)
1/2 cup brown rice syrup, at room temperature
1 cup salted roasted peanuts, chopped well
6 bamboo skewers
Wax paper
Stick skewers through the bottoms of the apples. Make sure apples are secure. Set aside.
Spread a piece of parchment paper over a cutting board. Make room in your fridge for the cutting board, because you’ll be chilling the whole shebang.
Stir peanut butter and brown rice syrup together in a small sauce pan. Gently heat over low heat, stirring constantly with a fork, just until smooth and heated through. It should fall from your fork in ribbons. If it seems stiff, turn the heat off immediately and add a little extra brown rice syrup, until it’s fluid again. This happens because different peanut butters have varying amounts of moisture.
Use a spoon to spread peanut butter caramel over the entire apple. Sprinkle with peanuts, pressing peanuts into the caramel to make them stick. It’s ok if a few fall off. Place apple upside down on the wax paper and continue with the rest of the apples.
Transfer the cutting board with the apples to the fridge. Let set for at least 3 hours. Now apples are ready to eat!
*this recipe is from theppk.com
Truffles *
|
 |
- 1 12-ounce package non-dairy chocolate chips (about 2 cups)
- 8 ounces non-dairy cream cheese, such as Tofutti’s Better Than Cream Cheese
- 2 cups powered sugar
- 2 tablespoons flavored syrup, such as hazelnut or vanilla (optional)
- chopped nuts (optional topping)
- coconut flakes (optional topping)
- 1 cup non-dairy chocolate chips (optional topping) cok.net
Put the non-dairy cream cheese in a food processor or high-powered blender and slowly add the sugar. Blend until well mixed. Then add the melted chocolate chips to the cream cheese mixture and blend until well mixed. If using flavored syrup, add the syrup to the mixture and blend for 30 seconds. Pour the blended mixture into a bowl and refrigerate for 2 hours.
Once chilled, roll the mixture with your hands into bite-sized balls and place on a serving tray.
If using optional toppings, pour the nuts and/or coconut flakes into a shallow bowl and roll the chilled balls into them. Place the truffles on a tray and refrigerate for 30 minutes.
For truffles with a hard chocolate coating, after the chilled mixture has been rolled into bite-sized balls, melt 1 cup of non-dairy chocolate chips. Dip the balls into the melted chocolate, place on a tray, and refrigerate for 2 additional hours.
*cok.net
 |
| theppk.com |
Chocolate Pumpkin Loaf*
1/4 cup applesauce2 tablespoons coconut oil (or canola oil)
1/3 cup unsweetened cocoa powder
1/3 cup + 2 tablespoons boiling water, divided (see note)
1 cup pumpkin puree
1 cup sugar
1 teaspoon pure vanilla extract
1 1/2 cups all purpose flour
1/2 teaspoon cinnamon
1/4 teaspoon nutmeg
1/4 teaspoon ground ginger
1/8 teaspoon cloves
3/4 teaspoon baking soda
3/4 teaspoon salt
1/2 cup chocolate chips
Preheat oven to 350 F and lightly grease an 8 inch loaf pan. Also, boil some water in a tea kettle (no need to measure yet.)
Put applesauce, coconut oil and cocoa powder in a mixing bowl. In a separate bowl, sift together flour, spices, baking soda and salt.
Measure out 1/3 cup boiling water and pour into the bowl with the chocolate mixture, mixing quickly to make a smooth chocolate sauce. Add pumpkin, sugar and vanilla and mix well.
Dump about half of the flour mixture into the chocolate mixture and gently stir just to incorporate, then measure out 1 tablespoon of boiling water and stir again. Now add the rest of the flour mixture and another tablespoon of boiling water and stir just until smooth. Take care not to overmix. Fold in the chocolate chips.
Spoon the batter into the prepared loaf pan. It will be good and thick. You can smooth the top out with a spatula.
Bake for 55 minutes to an hour. Stick a steak knife into the center of the loaf to check for doneness. A little bit of wetness is okay since it could be from a chocolate chip, but the knife should come out mostly dry.
Let cool for 10 minutes, then invert pan and place loaf on a cooling rack to cool most of the way. It’s yummy a little bit warm, or thoroughly cooled. Slice and serve!
*as the pictures say this recipe is from theppk.com
 |
| theppk.com |
 |
| bittersweetblog.wordpress.com |
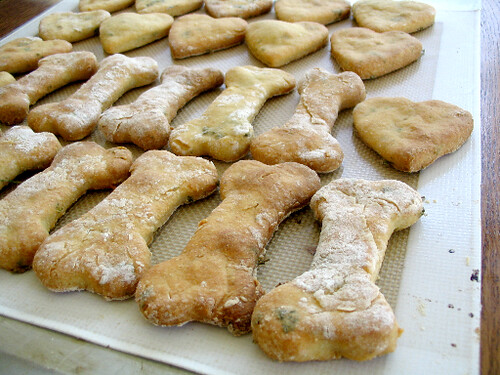
Dog Biscuits*
1/2 Cup Soybean Flour
1 3/4 Cup AP Flour
3/4 Cup Cornmeal
1/4 Cup Dried Parsley
1/4 Cup Canola Oil
1 Cup Vegetable Stock
1 3/4 Cup AP Flour
3/4 Cup Cornmeal
1/4 Cup Dried Parsley
1/4 Cup Canola Oil
1 Cup Vegetable Stock
Stir together the soybean flour, cornmeal, 1 cup of the AP flour, and parsley together in a medium bowl. Add in the oil and veggie stock, stirring well. Once fully combined, add in the remaining amount of AP flour, and keep on stirring it until all of the dry ingredients have absorbed – It may take quite a bit of mixing, agitating, and kneading, but it will all come together eventually! When your dough is completely homogeneous and only slightly sticky, use a rolling pin to flatten it out to a thickness of about 1/4 inch. Use cookie cutters to make the shapes that you want and lay them out on a silpat-lined baking sheet. Bake for 25 – 30 minutes until golden brown. Remove biscuits from the oven and let air-dry overnight, or for at least 8 hours before storing in an airtight container.
Keep in mind that homemade biscuits go bad much faster than store bought, so use this as an excuse to spoil your furry friend even more than usual!
Printable Recipe
 | ||||||||
| bittersweetblog.wordpress.com |
*from bittersweetblog.wordpress.com
A special recipe just for fall! below!
Pumpkin Chocolate Chip Cupcakes*
Makes 12 cupcakes
|

- 1 cup canned pumpkin
- 1/3 cup oil
- 1 cup granulated sugar
- ¼ cup soy milk
- 1 teaspoon vanilla extract
- 1 ¼ cups all-purpose flour
- ½ teaspoon baking powder
- ½ teaspoon baking soda
- ½ teaspoon ground cinnamon
- ¼ teaspoon salt
- ½ cup chocolate chips
- ½ cup confectioners’ sugar
- ½ teaspoon ground cinnamon
- 2 tablespoons margarine, melted
- 1 tablespoon soy milk
- ½ teaspoon vanilla extract
Cupcakes:
Preheat oven to 350 degrees F. Line muffin pan with cupcake liners.
In a medium bowl, stir together pumpkin, oil, sugar, soy milk, and vanilla. Sift in the flour, baking powder, baking soda, cinnamon, salt. Stir together with a fork—don’t use a handheld mixer, as it will make the batter gummy. Once well combined, fold in the chocolate chips.
Fill liners two-thirds full. Bake for 22 to 24 minutes. Transfer to a wire rack and let fully cool before icing.
Icing:
Place sugar and cinnamon in a small bowl. Add the margarine, soy milk, and vanilla and stir with a fork until smooth. Keep at room temperature until ready to use. The mixture should look opaque and honey brown. If it’s glistening a lot or looks too liquid, add a little extra confectioners’ sugar.
*This recipe is courtesy of Vegan Cupcakes Take Over the World
Chewy Chocolate Chip Cookies*
Makes 25 to 30 cookies
 |
| cok.net |
- 1 cup of softened soy margarine
- 1/2 cup brown sugar
- 1/2 cup sugar
- 1/4 cup soy milk
- 1 teaspoon vanilla
- 2 1/4 cups flour
- 1/2 teaspoon salt
- 1 teaspoon baking soda
- 12 ounces dairy-free chocolate chips
In a large bowl, mix the margarine, sugar, and brown sugar until it's light and fluffy. Slowly stir in the soy milk then add the vanilla to make a creamy mixture.
In a separate bowl, combine the flour, salt, and baking soda. Add this dry mixture to the creamy mixture and stir well. Then fold in the chocolate chips.
Drop small spoonfuls onto non-stick cookie sheets and bake for 8 to 10 minutes.
*cok.net
Vanilla Bean Cupcakes With Chocolate Ganache*
Makes 1 dozen cupcakes |
| theppk.com |
For the cupcakes:
1 cup unsweetened almond milk
1 teaspoon apple cider vinegar
1 1/4 cups all-purpose flour
2 tablespoons cornstarch
3/4 teaspoon baking powder
1/2 teaspoon baking soda
1/2 teaspoon salt
1/3 cup canola oil
3/4 cup sugar
1 1/2 teaspoons pure vanilla extract
1 vanilla bean, split lengthwise and scraped
For the ganache:
1/3 cup almond milk
1/3 cup semisweet chocolate chips
2 tablespoons pure maple syrup
Bake the cupcakes:
Preheat oven to 350 F. Line muffin pan with cupcake liners. Spray lightly with cooking spray.
Whisk the almond milk and vinegar in a measuring cup and set aside for a few minutes to get good and curdled.
Sift the flour, cornstarch, baking powder, baking soda, and salt into a large bowl and mix.
Beat together the almond milk mixture, oil, sugar, vanilla extract and vanilla bean in a large bowl. Sift in the flour, cornstarch, baking powder, baking soda, and salt, and mix until no large lumps remain.
Fill cupcake liners two-thirds of the way and bake for 20 to 22 minutes. Transfer to a cooling rack to cool.
In the meantime, prepare the ganache.
 |
| theppk.com |
In a small sauce pan, bring the milk to a boil and then lower the heat to a simmer and add the chocolate and syrup. Mix with a rubber spatula for about 30 seconds. Turn heat off, continue stirring until the chocolate is fully melted and the icing is smooth.
To assemble:
Let ganache cool for about 10 minutes. Dip the top of the cupcake in the ganache and then set them on a cooling rack. Spoon the remainder of the ganache over cupcakes. Let set in a cool room for an hour or so, or place in the fridge to set. Serve to happy people!
*this nummy recipe is from theppk.com
Strawberry Rhubarb Crumb Pie*
Makes one 9 inch pie |
| theppk.com |
Unbaked single pastry crust, fit into a 9 inch pie plate, edges crimped
Filling:
3 cups rhubarb, sliced 1/2 inch thick
4 cups strawberries, fresh or frozen (see tips page XX), sliced 1/4 inch thick
2/3 cups sugar
2 tablespoons tapioca flour
2 tablespoons all-purpose flour
1 tablespoon fresh lemon juice
1/8 teaspoon salt
Topping:
1 cup all-purpose flour
1/3 cup brown sugar
2 tablespoons white sugar
1/4 teaspoon salt
1/4 teaspoon cinnamon
1/3 cup non-hydrogenated margarine, melted (or canola oil)
Preheat oven to 425 F.
Combine all of the filling ingredients together in a large mixing bowl.
In a separate bowl, combine all dry ingredients for the topping. Drizzle in the margarine and use your fingers to swish around the mixture until crumbs form. Some of the topping is still going to be sandy and that’s fine, just so long as you have mostly nice big crumbs.
Add filling to the prepared pie shell and top with the crumb topping. Cover loosely with tin foil and poke a few holes in the foil to let steam escape.
Bake for about 20 minutes at 425 F. Lower heat to 350 F, and remove the tin foil. Bake for an additional 30 to 35 minutes, filling should be bubbling and the crumb topping should be golden. Place on a cooling rack and let cool for about 30 minutes before serving.
* i got this recipe from theppk.com and the writers of that website have a new book cming October 25, 2011. Vegan Pie In The Sky.
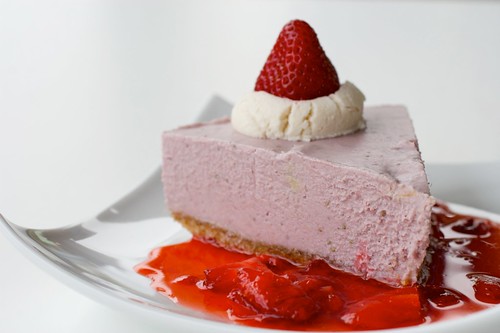
Raw Strawberry Cheesecake*
Serves 16
 |
| theppk.com |
Crust
1 cup pecans
1 cup almonds
1/4 teaspoon salt
4 medjool dates, pitted and chopped
Filling
3 cups raw cashew pieces, soaked overnight (or at least 3 hours)
1/2 cup agave syrup
1/4 cup water
1/4 cup fresh lime juice
1 teaspoon vanilla extract (alcohol free is preferred for raw desserts)
32 oz strawberries (reserve 9 for decorating), hulled and halved – about 4 cups
3/4 cup coconut oil, melted
Raw Fluffy White Frosting Recipe
1/2 cup raw cashew pieces, soaked overnight
1/2 cup water
2 tablespoons agave syrup
1/2 teaspoon vanilla (alcohol free is preferred for raw desserts)
1/4 cup raw coconut oil, melted
Strawberry Coulis (Coulis is a fancy word for pureed sauce)
2 cups chopped strawberries
3 tablespoons agave syrup
Lightly grease a 9 inch spring form pan with coconut oil and set aside.
To prepare the crust, pulse nuts and salt in a food processor fit with a metal blade. When nuts are fine crumbs, add the dates and pulse until the dough holds together when squeezed between your fingers. Firmly press crust into the bottom of prepared cake pan. Set aside.
To prepare the filling, pulse cashews in food processor until crumbly. Add agave, water, lime juice and vanilla and puree until very smooth, scraping down the sides with a rubber spatula to make sure you get everything. Feed the strawberries through the top of the food processor and puree until incorporated. The filling should turn a pretty pink. With the processor running, add the melted coconut oil in a steady stream.
Pour the filling into the cake pan. It will look like a smoothie and you’ll think no way it will set, but it will! Cover with plastic wrap and place in the fridge to set. Make sure it’s level so that your cake doesn’t come out wonky. Let set for at least 4 hours.
Prepare the frosting in basically the same way as the cake. Pulse the cashews in the food processor until crumbly. Add the water, agave and vanilla and blend until smooth. With the food processor running, stream the coconut oil in through the top until combined. Pour into a bowl and cover with plastic wrap. Chill until set, about 2 hours.
Prepare the sauce when you’re close to serving. Just mash the strawberries up with the agave until it’s all red and syrupy.
To assemble
Release the cake from its springform prison. Use a mini scoop to place 8 mounds of icing around the perimeter of the cake and one in the center. Slice the tops off the reserved strawberries and gently smush them upside down into the frosting mounds. If you don’t have a mini scoop, just use a spoon and make them as pretty as you can, they’re gonna get smushed anyway.
To serve, place some Strawberry Coulis on the plate and serve the cake over it. Dig in!
 |
| theppk.com |